
Roofing Tips & Guides
Expert Roofing Advice for Charlotte Homeowners
Learn from Charlotte's trusted roofing experts. Tips on maintenance, repair, replacement, and protecting your home from the elements.
Ice & Snow Damage? Get 10% off repairs with a free inspection.
Learn from Charlotte's trusted roofing experts. Tips on maintenance, repair, replacement, and protecting your home from the elements.

You see a water stain on your ceiling. It's brown and ugly and getting bigger every time it rains.
So you head up to the attic with a flashlight. You look directly above the stain. But there's nothing there. No wet wood. No obvious drip. Just dry insulation and confusion.
Welcome to the most frustrating thing about roof leaks: water is sneaky. It doesn't travel in a straight line. It wanders. It follows wood grain. It slides along rafters. It can enter your roof in one spot and show up ten feet away.
After two decades of tracking down leaks across Charlotte and Lake Norman, I've learned that most homeowners are looking in the wrong place. And that's not their fault. Water is basically a liquid detective with a grudge against your ceiling.
Today, I'm going to show you exactly where leaks start. The usual suspects. The vulnerable spots where water finds its way past your shingles and into your home.
This isn't a DIY repair guide. It's a knowledge guide. Because when you understand how leaks happen, you can spot problems early. You can ask better questions. And you won't get taken advantage of by storm chasers who show up after every thunderstorm.
Let's start with the basics.
Here's the thing about water: it's lazy. It takes the path of least resistance.
When water gets under a shingle, it doesn't just drip straight down. It travels horizontally first. It follows the slope of your roof deck. It slides along the underside of the shingles. It finds nail holes. It seeps into tiny cracks in wood.
According to research from building science experts, water can travel several feet laterally before it finally drips down into your attic. That's why the wet spot on your ceiling might be nowhere near the actual entry point.
We've seen leaks that started at a chimney and showed up twelve feet away near a wall. We've tracked water from a damaged pipe boot all the way across three rafters before it finally dripped onto someone's insulation.
Water is patient. It waits for the right conditions. Some leaks only happen during heavy wind-driven rain. Others only appear when ice builds up. A few only leak when your gutters overflow.
That's why professional leak detection requires experience. You need to understand how water moves. Where it hides. What it's attracted to.
Now let's talk about where most leaks actually start.

In my experience, about 80% of roof leaks start in one of three places:
These are the vulnerable spots. The transition zones. The places where different materials meet and have to work together to keep water out.
Your shingles do a great job on the main roof field. When they're installed correctly and maintained properly, they can last 20-30 years without issue.
But flashing? Pipe boots? Valleys? These are where roofs fail first.
Let me break down each one.
Flashing is thin metal (usually aluminum or galvanized steel) that directs water away from vulnerable areas.
You find flashing around chimneys. Along walls where your roof meets siding. At roof edges. Around skylights and dormers. Basically anywhere your roof intersects with something vertical.
The problem? Flashing relies on sealant and precise installation. Over time, sealant dries out and cracks. Metal expands and contracts with temperature changes. Nails work loose. And suddenly water has a way in.
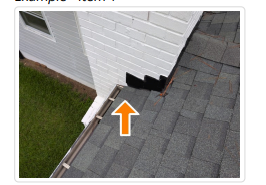
Chimney flashing is probably the most common leak source we see in Charlotte. Here's why it fails:
Your chimney is made of brick or stone. It's solid and doesn't move. Your roof is made of wood and shingles. It expands in heat and contracts in cold. These two materials move at different rates.
The flashing has to bridge that gap. It has to stay flexible enough to handle movement but tight enough to keep water out. That's a tough job.
Good chimney flashing has two layers. Step flashing (L-shaped pieces that weave between shingles) and counter flashing (a cap that tucks into the chimney mortar). When either layer fails, water gets in.
We see a lot of chimneys where someone just slapped caulk around the base and called it waterproofing. That lasts about six months before it cracks. Then you've got a leak that gets worse every rain.
Wall flashing is another common failure point. This is where your roof meets a vertical wall (like on a dormer or addition). Water runs down the siding and hits the roof. If the flashing isn't installed right, that water goes straight under your shingles.
Proper wall flashing needs to go up the wall at least four inches. It needs to be covered by the siding. And it needs to overlap the shingles below it. Miss any of those details and you've got a leak waiting to happen.

Every house has pipes that poke through the roof. Plumbing vents. Kitchen exhaust. Bathroom fans. Maybe a radon mitigation pipe.
Each one of those pipes needs a seal. That seal is called a pipe boot or vent boot. It's usually made of rubber or neoprene with a metal base that slides under the shingles.
Here's the problem: rubber doesn't last forever. Especially not in North Carolina where we get intense summer sun and freezing winter temperatures.
UV radiation from the sun breaks down rubber. It gets brittle. It cracks. Eventually it splits completely open. And when that happens, you've got a direct path for water to pour into your attic.
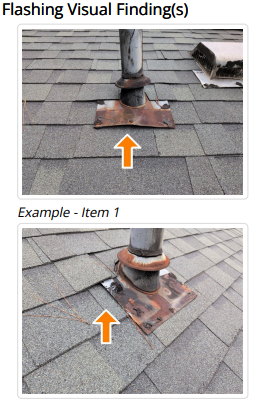
Look at those cracks. That's what happens to pipe boots after 10-15 years of exposure. The rubber literally disintegrates.
Most homeowners never look at their pipe boots. They're on the roof. Out of sight, out of mind. Until water starts dripping from the ceiling.
We check pipe boots on every inspection we do. If they're cracked or worn, we recommend replacement before they leak. A new boot costs about $50-75 installed. Way cheaper than fixing water damage inside your house.
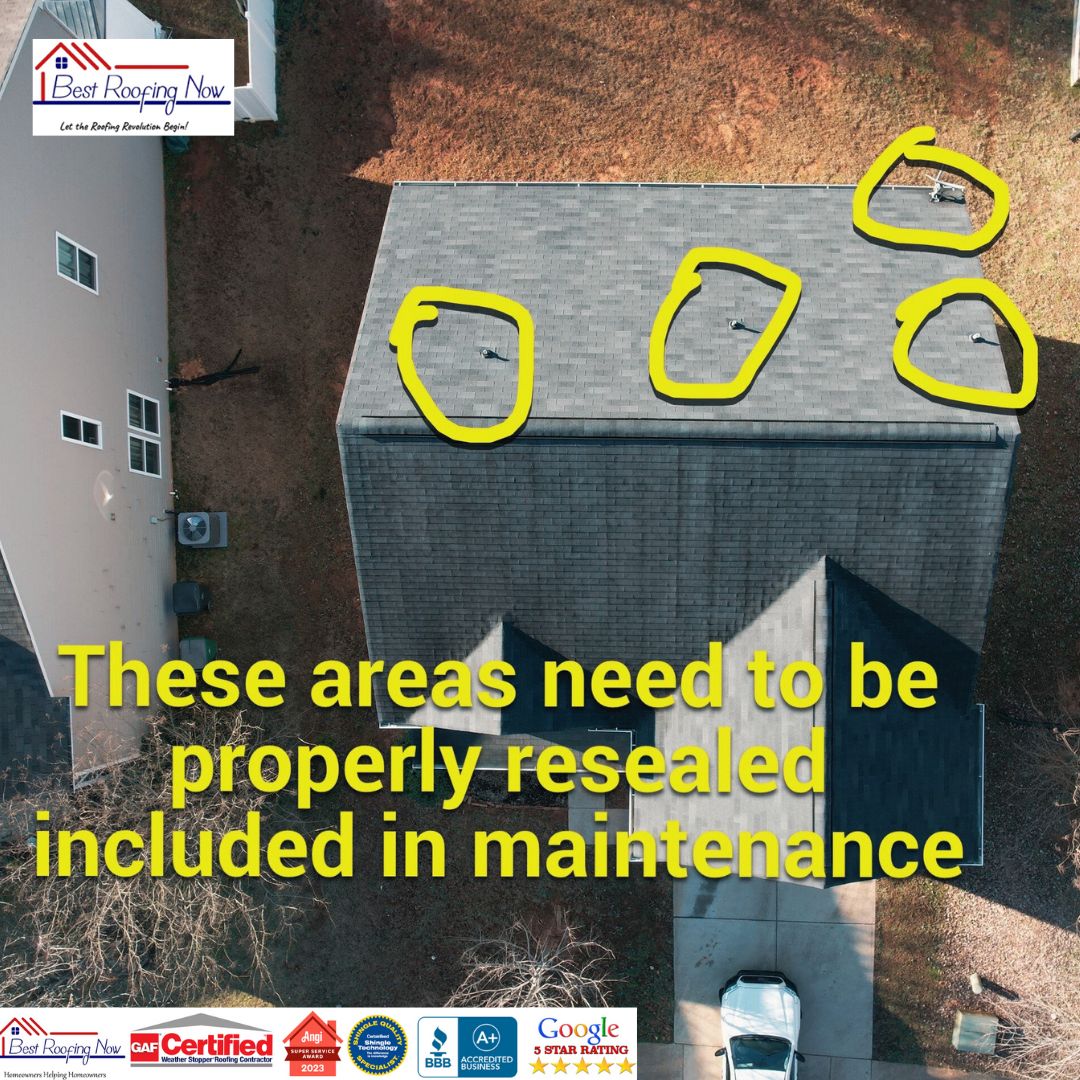
Some pipe boots can be temporarily sealed if they're just starting to crack. But that's a band-aid, not a fix. Eventually they need replacement.
The other issue with pipe boots is improper installation. I've seen boots that weren't sealed to the pipe. Boots that weren't tucked under the shingles above them. Boots that were just set on top of shingles with no waterproofing underneath.
All of those installations will leak. Usually within the first year.
A valley is where two roof slopes meet and form a V-shape. All the water from both roof planes funnels into that valley and rushes downward.
That's a lot of water moving fast. If your valley isn't built right, it will leak.
There are three types of valley construction:
Each type has its pros and cons. Metal valleys handle water best but can rust or develop holes. Woven valleys look cleaner but can trap debris. Closed-cut valleys are popular but require precise cutting.
Valley leaks usually happen for one of three reasons:
Debris buildup. Leaves, pine needles, and granules wash into valleys and create dams. Water backs up under the shingles. We see this a lot in Lake Norman where there are tons of mature trees. In fall, valleys can clog up in a week.
Worn-through metal. If you have metal valleys, they can rust through over time. Or develop holes from branches scraping across them. Once there's a hole, water pours straight into your attic.
Poor installation. Valleys need extra waterproofing. Ice and water shield (a sticky waterproof membrane) should run the full length of every valley. If the installer skipped that step or didn't overlap pieces properly, you'll get leaks during heavy rain.
According to the National Roofing Contractors Association, valleys should have at least two layers of protection: the underlayment and the valley material itself. Anything less is asking for trouble.
Flashing, boots, and valleys are the big three. But leaks can start in other places too.
Skylights are beautiful until they leak. The flashing around a skylight has to seal four sides. That's four opportunities for failure. Plus skylights have moving parts (if they open) and condensation issues. We've replaced a lot of skylight flashing over the years.

Missing or damaged shingles are obvious leak sources. But here's what's not obvious: a single missing shingle won't always cause a leak right away. Your underlayment might hold for a while. But once that underlayment fails (and it will), water rushes in.
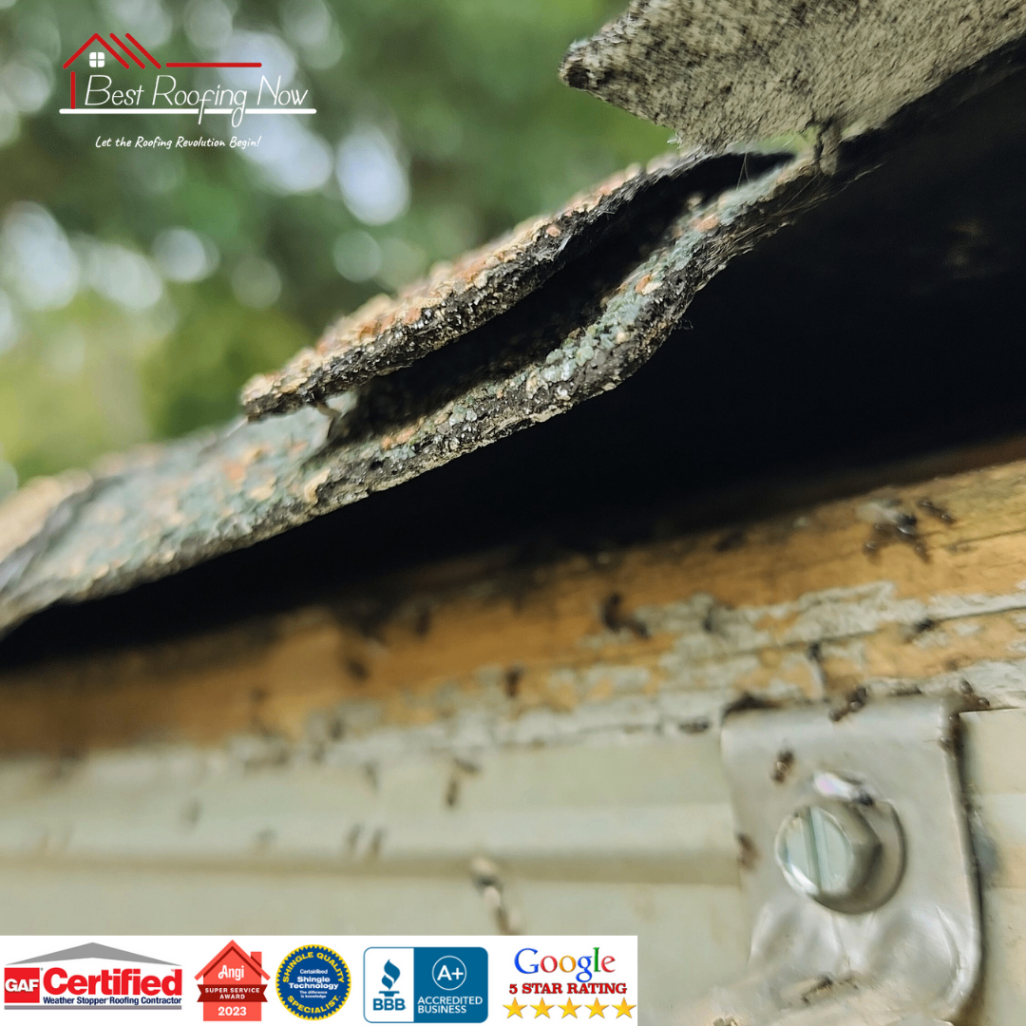
See how those shingles are curling up? That creates gaps. Wind-driven rain can force water underneath. And once water gets under shingles, it spreads.
Nail pops and exposed fasteners happen when nails work their way up through shingles. Could be from temperature cycling. Could be from improper installation. Either way, you've got a nail hole that water can seep through.
Roof-to-wall transitions are tricky. Any time your roof meets a vertical surface (a dormer, an addition, a second story), you need proper flashing. We see a lot of these done wrong. Siding installed before flashing. No kickout flashing to direct water away. Caulk used instead of metal.
When someone calls us about a leak, we don't just look at the wet spot and guess.
We start by asking questions. When does it leak? During every rain or just heavy storms? Is it always in the same spot? Has it gotten worse over time?
Then we do a thorough roof inspection. We look at the obvious spots first (flashing, boots, valleys). We check for damaged shingles. We look at how water flows across the roof.
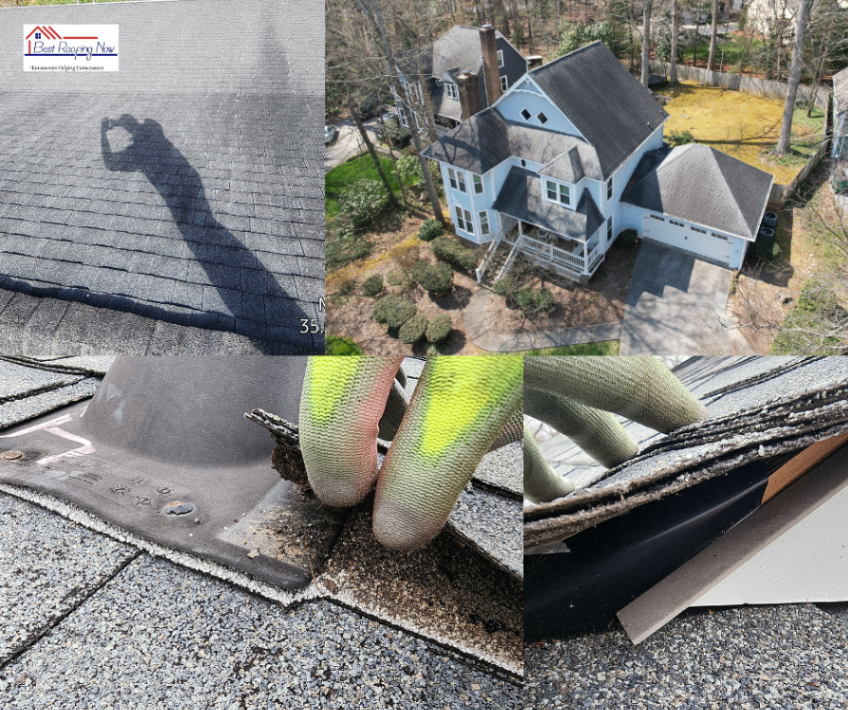
Sometimes we need to get in the attic during a rain event. That's the best way to see where water is actually entering. We've spent hours in attics watching for drips so we can trace them back to the source.

We also use moisture meters to detect hidden water. Just because wood looks dry doesn't mean it is. A moisture meter tells us if there's water trapped in your roof deck or framing.
The goal is to find the actual entry point. Not just where water shows up. Because if we patch the wrong spot, you'll still have a leak. And you'll be frustrated. And we'll have to come back out.
That's why we take our time. We'd rather spend an extra hour finding the real problem than rush through and miss it.
The best way to deal with leaks is to prevent them.
That means regular inspections. We recommend having your roof inspected every 2-3 years if it's in good shape. Every year if it's over 15 years old. And after every major storm.
During an inspection, we look at all the vulnerable spots I mentioned. We check flashing for rust or separation. We examine pipe boots for cracks. We look in valleys for debris or wear.
We also check your gutters. Clogged gutters cause water to back up under your roof edge. That can lead to rot in your fascia and soffit. Eventually it works its way into your attic.
Small problems are cheap to fix. A cracked pipe boot costs $75. A missing shingle costs $150. Resealing some flashing costs $200.
But if you ignore those small problems? They turn into big problems. Water damage in your attic. Mold growth. Rot in your roof deck. Stained ceilings. Damaged insulation.
Suddenly you're looking at thousands in repairs. All because a $75 pipe boot didn't get replaced.
We've seen it happen too many times. That's why we're honest during inspections. If something needs attention, we tell you. If it can wait a year, we tell you that too.
Our goal isn't to sell you a new roof. It's to keep your current roof working as long as possible. Because that saves you money and builds trust.
Roof leaks are frustrating because they're mysterious. Water shows up in one spot but enters in another. It travels in unexpected ways. It waits for the right weather conditions.
But leaks aren't random. They start in predictable places: flashing, pipe boots, valleys, and transition points.
When you understand those vulnerable spots, you can stay ahead of problems. You can catch issues early. You can ask your roofer the right questions.
And if you're dealing with a leak right now, don't wait. Water damage gets worse over time. It never gets better on its own.
If you've got a mysterious leak or just want peace of mind about your roof, we offer free inspections throughout Charlotte and Lake Norman. No pressure, no sales pitch. Just an honest assessment of what's going on.
We'll find the real source of the leak. We'll explain what needs to be done. We'll give you a fair price in writing.
Because after 20+ years in this business, we've learned that honesty beats hype every time.
Call us at Best Roofing Now or visit bestroofingnow.com to schedule your free inspection. Let's track down that leak before it turns into bigger problems.
Best Roofing Now
Charlotte's trusted roofing experts since 2019
Based on this article, you may be interested in these services.
We proudly serve these Charlotte-area communities with professional roofing services.
View All Service Areas →See our recent roofing work across the Charlotte metro area.

Charlotte, NC
work in progress

Charlotte, NC
new roof

Charlotte, NC
before after

Charlotte, NC
new roof
Get a free roof inspection and honest assessment from Charlotte's most trusted roofing company.


